Where do I start for remote access to my video security system?
It is important to view your cameras on your phone and tablet so that you can keep an eye on your assets. Downloading the TechProSS application is the first step in making this a reality. If you own an iPhone, you need to use the App store or iTunes to download the program to your phone. There is a TechProSS Lite or TechProSS Plus that you can download for your phone. Compare the features and see if the $5 one-time fee for TechProSS Plus includes features that you will need compared to the free Techpross Lite version. The Lite version contains a majority of the features, and most people will not use the additional features. However, if you want to support the development of a maturing program, the paid version will help out in that respect. There is an HD version for iPad that fits the bigger screen and higher resolutions. If you own an Android phone, then you will need to use Google Play to search for TechProSS. There will also be a lite version, a plus version, and an HD version for the tablets. Whichever version you choose, they will look and feel the same. This article is going to focus on the Lite version, which is what most people will install or start with.
The network needs to be set up and port forwarding needs to be done!
If you want to view cameras on your phone, the port forwarding needs to be set up in the router. Let’s just say for the purpose of an example that your router takes a Gateway address of 192.168.1.1, and your DVR takes the default address of 192.168.1.108. Make sure that your DVR is set to static and NOT Dynamic / DHCP. You would then need to forward the default TCP port of 37777 to the IP address of 192.168.1.108. It is extremely important for the DVR to be on the same network as the Gateway. How do I know what address my Gateway is located? Good question! You can open a DOS box in windows and type “ipconfig” to find your Gateway address. It will also show the IP address that your computer is connected to the Gateway. If you have a cable modem at a 10.0.0.1 network, you can then set the IP address of your DVR to 10.0.0.108 for example. If you need to know if that IP address is available on your network, you can ping 10.0.0.108 using a DOS box terminal window to see if anything responds. The traffic from the internet needs to go through the router straight to the DVR using the port you specify.
The networking part is done, so let’s move on to the configuration.
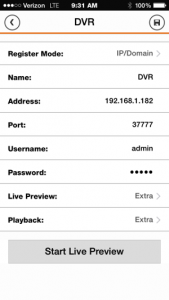
 The most import part to be aware of is the Register Mode. P2P is the default, so this must be changed before you get started. The Register mode that you will use is called IP/Domain because we will enter an IP address or a Domain name. A Domain name can be any name that points to your Digital Video Recorder (DVR) or Network Video Recorder (NVR), but most people will be using a DDNS or Dynamic Domain Name System. An IP address is a number that points to your DVR or NVR, but be aware that there are Internal IP addresses and External IP addresses. My screenshot has an internal IP address so that I can access my DVR on my Wifi. If you want to access your DVR on your Wifi, you will need to do the same. You can treat your one DVR as if it is two DVRs so that you can view your cameras internally from within your network and externally from the outside of your network. The next entry in your Device Manager Setup screen will be Name. This is a generic term that you name your DVR. For example, “DVR at Home” is a name for inside the network, and “DVR Away” is a name for away from my home. Address will be your name or number. An example could be 192.168.1.182 as a number, or javajeffsdvr.techproddns.com as a name. The port is going to be 37777, which is the default in the DVR. Some people have two DVRs, and may set one of them to the recommended 47777. If you only have one DVR, you will always use 37777 which is different than the 80 TCP or 88 TCP port that you use for Internet Explorer. Username and Password are easy to understand, but this is where you need to be concerned. It is very important for you not to use the default admin / admin account. Create a new admin level account so that you do not lock your only admin account. The other accounts that come in the DVR are used only at the machine, so you can be away from your DVR and easily be locked out. You absolute need to make a new admin account, so I would do something like this for my access to my DVR: jeff / jeff. This way if I ever lock the account, I can log in using the admin / admin account to reboot the unit or unlock the account that I use daily. Always create extra accounts for people using the DVR so your only account is not locked from typos and other issues. Moving on to the streams, the extra stream is the default. You should not use the high bandwidth stream on your smart phone or tablet. I only saw one exception to the rule where a person had a 22” android tablet. If you have an android based computer, I can understand using the Main stream on a big screen like that. Otherwise, stick with the default lower bandwidth Extra stream for viewing on a smart phone or tablet.
How can I view my cameras in TechProSS mobile software without having to select each camera every time I run the application?
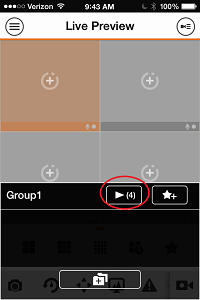
You can add cameras to a favorites group. Once you create a group of cameras, you can then load your group at the Live Preview screen by pressing the star and hitting the play button. You can create many groups and name them what you like so they are easy to find.

Check out our demonstration videos of our video management apps here.

