Most of the time when someone purchases a security system, it’s so they can have a recorded record of events that can be reviewed and analyzed at a later time. Unless you plan to view your cameras remotely and never record or review past video footage you will need a storage device or (CCTV Hard Drive) to record to.
Everyone’s storage requirements vary. In many cases 1 week of storage might be fine, assuming that you would be aware that an event had taken place within that 1 week time frame. If you are a business owner, someone who travels, or someone who leaves their properties unattended for long periods of time, you might need more storage. This is due to the fact that it may be weeks or even months before you realize that you need to go back and review your recorded video. One of the biggest mistakes people make when buying a security system is to try and save money be purchasing less storage. If in fact a crime does take place the most important thing is the the video is still there to be reviewed.
When you have a storage device or drive installed it will keep recording until the drive if full and then overwrite the oldest recordings first in order to store new video. In that respect it’s very similar to a television DVR such as TiVo or one supplied by Comcast, DirectTV or Dish Network.
When calculating how much drive space you need it’s helpful to know a two basic things.
1. First how many cameras will you have.
2. Second, How many days of recorded video to you want to have stored at any time.
Other factors include the resolution your cameras will be set to record at, the video frame rate, and how many hours per day you will be recording.
Once you have this basic information you can do some standard calculations to find out how much CCTV hard drive space you will need for your DVR or NVR. Instead of turning this in to a math class I recommend using the “CCTV Hard Drive Calculator” on SecurityCameraKing.com.
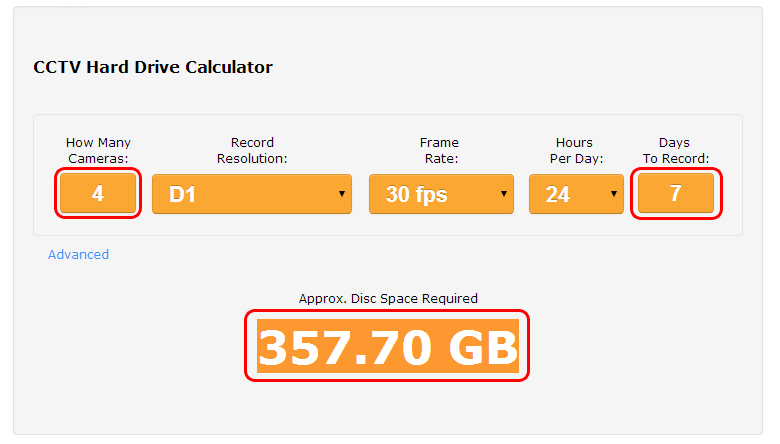
In the illustration below we’ve determined that if we will have 4 cameras recording at D1 resolution, 30 frames per second, 24 hours a day, 7 days per week, it will take up 357.70 Gigabytes. So what does the all mean?

First it’s important to understand that 1000 Gigabytes = 1 Terabyte. Now if you do some basic math this becomes a bit clearer.
350 Gigabytes x 3 = just over 1 Terabyte. So a 1 Terabyte hard drive will get you about 3 weeks of video storage. That sound pretty good, but what if you have 16 cameras?

Now you can see you are using almost 1.5 Terabytes per week. So that means if you have a 1TB hard drive you will only get around 4 days of recording.
It is also important to note that the video resolution we are using for this example is D1. D1 is 720 x 408px resolution and is standard for most analog video cameras. Once you get into high definition cameras like HD-CVI and IP cameras, the resolution increases greatly and requires a lot more storage space. A 2 Megapixel IP camera for instance has a resolution of 1920 x 1080px (1080p). That will take up about 3 times the storage space as a D1 camera.
So if you don’t want to sacrifice how many cameras you have or how many days of video you can store, what do you do?
The first thing you could do is record at a lower resolution, although that’s not a very popular option. There is really no reason to purchase a high resolution camera simply to record low quality video.
A more popular approach is for you to lower the frame rate or frames per second. Don’t get Frames Per Second (FPS) confused with the resolution of the camera. The FPS is how many frames are stored for 1 second of recorded video. The more frames recorder per second, the smoother the video plays back.

That basically means if you drop your Frames Per Second from 30 to 15 you will double your hard drive capacity. But be careful, if you set the frame rate to low it may result in choppy surveillance footage. The good news is that you would be surprised at how smooth 15 FPS looks. Some people even record at 7 FPS and still find it sufficient.
Remember, even if you reduce you FPS you are still recording at full resolution for each frame that is recorded.
Another option is to reduce the number of hours per day you record footage. A scenario were this could work is in a secure office or lab environment where video only needs to be recorded during working hours. In this case you could set you cameras to record from 9 a.m to 6 p.m. In a case like this you could triple your hard disc space.

If it’s not possible to only record during a certain time frame, you could also choose to set your cameras to record on motion only. This means that a camera will only record when motion is detected in the camera’s field of view. This will also greatly decrease the amount of disc space needed and increase you recording time. Another benefit of recording on motion is it makes it much easier to find events when reviewing your recordings. This is because most DVRs and NVRs will set a visual marker on the cameras timeline each time motion occurs.
Keep in mind that you don’t have to set all cameras to work the same way. You can mix, match and schedule each individual camera’s behavior.
Some security cameras can be set to record on a schedule, while some can be set on motion detect. You can even have all your cameras set to record motion between the hours of 9 a.m. – 5 p.m. then switch to full time recording at night.
If you combine the scheduled recording with motion based recording along with a frame rate reduction you will most certainly get a lot more recording time and increased storage out of you security system.
If you would like to try more CCTV Calculators please visit our “CCTV Calculators” Page.
