Here at SecurityCameraKing.com we offer a variety of IP cameras, and some of which have different tools that are used to help find the cameras on your network. For example, the two most popular series of IP cameras that we offer are the TP Series and the EL Series. These two series of cameras use a completely different finder tool. In other words, the TP Series Finder will find only TP cameras on your network and the EL series finder will find only EL cameras on your network. The EL Series Finder is something we like to call the Config. Tool, and we have recently released a new and improved version of this Config. Tool. The older version was very cut and dry. You could log into the camera and change the IP, set it to DHCP, and click a link that opens the camera in IE (Internet Explorer). This new Config. Tool has many more features that are going to come in handy when you need to make configuration changes. Please understand that if you are using a POE switch that is built in to the back of your NVR, these tools will not work, unless you set your computer to DHCP and plug it into that same switch. The computer will pull an IP from that switch and then you can use the tool, the reasoning behind this is, that switch is a completely different network than your NVR and your router. This is especially important when using the TP series IP cameras, but that’s another article in itself.
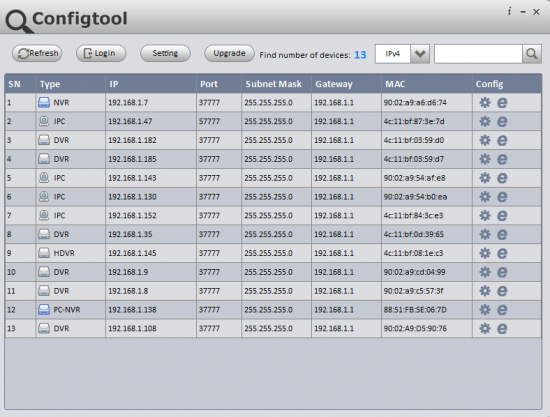
First thing is first, when you receive your EL cameras and want to get them up and running, it is important to plug them in one by one as not all of them are set to DHCP and if you plug multiple in at a time, you may cause an IP conflict and that will cause you to have network issues with the cameras. So you will need to download the Config. Tool, go to the link provided here https://www.securitycameraking.com/securityinfo/downloads/?wpdmdl=61&ind=0 or if you would like to know how to get there on your own for future reference go to www.securitycameraking.com > click on CCTV Learning Center > click on Downloads > click on Tools and Software Downloads > scroll down until you find “EL Series IPC/NVR/DVR IP Address Finder & Config Tool Downloads” > you will want to download the first option with the – Version 2.0 on the end. Once that is downloaded you are ready to set up your cameras using the Config. Tool. You will plug your first camera into your network by itself meaning one camera at a time, and open up the Config. Tool and you should see this screen ( Below).

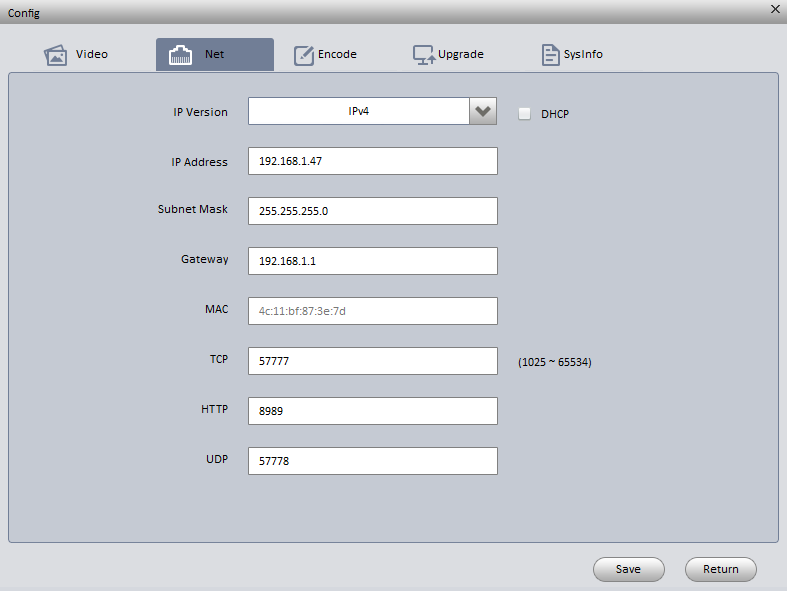
Once the camera is powered up and does its post you will see the camera’s IP address in that Config Tool. Even if your computer is on a different IP scheme than the camera it will find it. For example, say your router is at a 10.0.0.1 network, these cameras will come with a 192.168.1.1 default gateway. This is why the Config Tool is necessary, it will find that camera at 192.168.1.108 or what ever the IP of the camera may be on your network. Again, plug them in one at a time, and what you will do is click on the settings icon that looks like a gear under “Config” (Refer to picture above). In this page you can change video settings such as Brightness, Contrast, Hue, etc, and you can also make network changes if you would like. Click on the tab that says “Net”, here you will see the IP address of the camera, the gateway, and the ports used. What you will need to do first is put this camera on the same IP scheme as your router, and make sure you assign it an IP that is not currently being used, also make sure DHCP is NOT checked. See picture below!

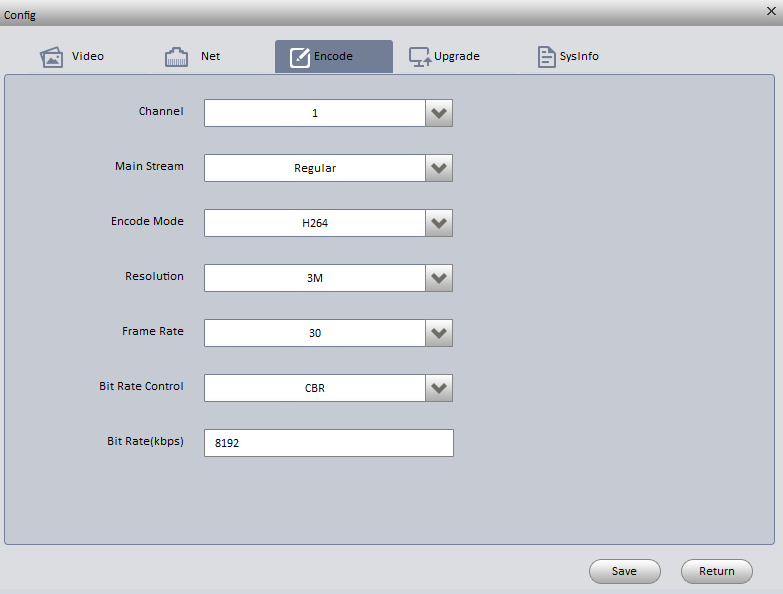
Once you have got this camera on your network you can set it up to your standards, and once you have done so, your EL Series IP camera will be up and running on your Network. With the old Config Tool, you would have to log into the camera via IE to do so, but with the new 2.0 version you do not have to do that and install the plug in and go through that nonsense. What you will need to do next is click on the tab that says “Encode” and you should see a screen that looks like the picture below. As you can see in this page you can change the way the camera will record under “Main Stream”. You will have the options of Regular, Motion, or Alarm. You can also change the resolution, so if you have a 3MP camera and want to set it to 1080p you can do so right here in the Config Tool. With the old Config Tool you would have had to go into IE and log into the camera, install the web plugin, and it was just a hassle. You can also change your bit rate here as well, so if down the road you need to lower the bit rate you do not need to log into your NVR to do so. Just log into the camera via the Config Tool and it is all right there. Another feature this new Config Tool has is you can upgrade your firmware from the Config Tool, but the old version had that as well. However, a feature that only this 2.0 has that coincides with firmware is, SYSINFO. This will tell you the current version of firmware you currently have, the build date, and the serial number. So, if you call us up needing a firmware update, we will ask you for all of this information. Normally you would have to log into the camera and find it in the camera’s menu. But now, it is all spelled out for you right here, easy as pie.

In addition, this tool will find all of our DVRs and NVRs on your network as well. The old version could do that, but the 2.0 version has features that help with setting up those DVRs and NVRs that the old version did not have. If you look at the first picture I provided up top, you will see the main screen of the tool. I want you to look at the second column labeled “Type”. That will tell you the ID of the IP you are looking at is an IP Camera, NVR, DVR, etc. The old tool did that as well, but wait. Click the gear next to your DVR or NVR to log in via the tool. You should see a screen that looks identical to the screen when you logged into your cameras. There is a huge difference though. Click on the drop down menu for channel, you will see all of the channels on your DVR. Now I want you to click on a channel other than 1 and you should see that the live preview changed to that camera. So, you can see all of your cameras directly from this tool. Why is that so important? Well, I will tell you. Before this new tool, when you wanted to change the encoding on an analog camera hooked up to your DVR, you needed to log into the DVR and do so. Now you can do all that right here. Go to the encode tab and select the channel you wish to configure, and you will be able to set how you want to record, motion, regular, or alarm. You can change the resolution, the frame rate, and the bit rate all from your config tool. If you have ever used the older version of this tool, you understand how big of a deal this is. the list of features goes on and on. If you have any further questions on the set up of EL cameras or how to use the Config Tool, please feel free to give our free tech support line at 866.573.8878, Option 3.
