There has been a lot of people who have asked how to stream an IP Camera to a Webpage. Well here we go!
Lets start by gathering the software and Hardware that we will need.
- Unreal Media Server – Free Version is fine for a few cameras.
- WampServer – To host your webpage [optional]
- WordPress [pen source website creation tool written in PHP]
- Computer that will run this Software
- IP Camera [ EL series IP Cameras]
Lets start by setting up our camera. For this article I will be using the <https://www.securitycameraking.com/1.3-megapixel-ip-indoor-59161-prd1.html” target=”_blank”>IPOD-EL1MPIR50-W
We will be setting the camera up to monitor the front door. Keep in mind that we are just getting the camera’s feed directly from the IP camera and not from an NVR. This means that you will not be able to go back and review recorded footage, just the live feed from the Webpage.
My Camera is set to 192.168.1.164. I will go ahead and install Unreal Media Server.
RTSP URl is : rtsp://xxx.xxx.xxx.xxx:554/cam/realmonitor?channel=1&subtype=0&unicast=true&proto=Onvif
Replace the X’s with your Network Camera IP address
In this video you will see how to add your IP camera so that we can go from RTSP to RTMP using the Unreal Media Server and also stream it out.
What we need to do next is open some ports on your computer, in my case Windows 8.1
You will need to Allow Outbound Data from ports 5119 [Players] and 5113 [Live Servers] on the Firewall Rules. For this you need to Open your Control Panel and navigate to Windows Firewall then click on Advanced Settings. This will open a new Window where you can add your Firewall Rules. Once you are in this new window you can add the rule by going on the left pane and clicking on “New Rule”. Then Tick the Radio Button, the one beside the “PORT” and click Next and then go and tick on the Specific remote Ports. Once you have done this, the area where you can specify the port number will allow you to add the port number that you need for Unreal Media Server. I am using the default which are the 5119 and 5113. At this point you are done with setting your Firewall Rules to allow outgoing Data from this application.
Great! We have finished these steps. Now since we are going to Host our own webpage we are going to be using Wamp Server. Wamp will allow you to Develop as well as Host your Domain name. Keep in mind that it is best to get a Domain name with a company that will allow for Dynamic IP Updates such as DYN.com. If not you will have to have your ISP give you a static IP. This is done so that the ISP will not change your IP address so when navigating to your domain/webpage your visitors do not end up in limbo as the address has changed. For example it is like setting your GPS to go to 123 Johnson street and all of a sudden your house is not there and now it is in 129 Johnson street .
Lets get started!
Download and Install Wamp onto your computer.
Open the Setup File and click next and accept the agreement. Then select where the WAMP folder will be residing. The default is fine. Tick the boxes to get your Shortcuts, click next and then install. In some cases it will ask you for the default web browser which is fine, then select your PHP mail Parameters. Default is fine, Localhost and your email address. Once you do this the application should start and if it does not, launch it using the Short Cut in your Desktop.
Once you have installed WAMP onto your computer you want to configure some settings before you can host your Web Page.
For this we will be navigating to the WAMP icon on the Tool Tray. Right-click on the icon and click on “Apache” then select “httpd.conf open”, this will open up a file.
It is easier if you choose to open it with Notepad ++. This will show the file in its structure versus notepad, as notepad might clump everything together and you end up either corrupting the file or making the wrong changes.
You want to click on your keyboard CTRL and F at the same time to open the Finder. Make sure that the file is selected and your cursor is on another application. Once you have opened up the Finder tool you want to input the following “servername”. Once you have located this on the document you want to change port 80 to 8080.
After doing this open again the Finder tool and search for “Listen”. Once you have located this, you want to find and change the line “Listen 80” to “Listen 8080” and also make sure that the “#” is removed. This means it is enabled.
Save the file and restart all services by clicking on the Wamp Icon on the Tool Tray. Once it has restarted, open your Web Browser and Navigate to http://localhost:8080/phpmyadmin.
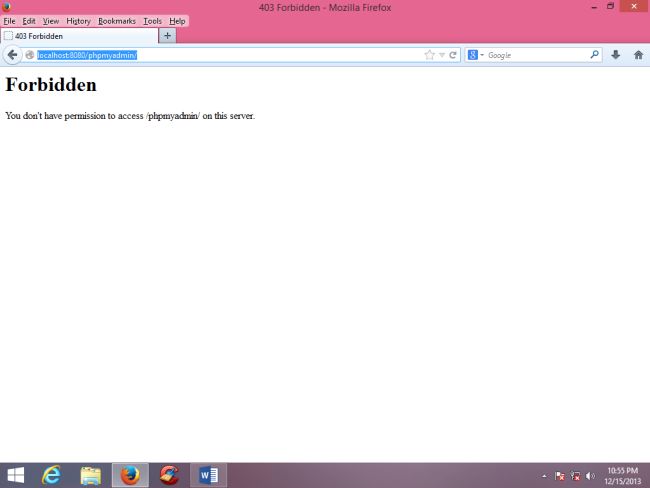
If it gives you the Following Error “Forbidden”, you want to go and modify a file called phpmyadmin.conf in “C:\wamp\alias”. Open it up with the notepad ++ application and make these changes.
Order Allow, Deny
Allow from all
Allow from localhost ::1 127.0.0.1
Save the document and restart all services . You should be able to access PHP my Admin page on your Browser.
Now that we have everything set, navigate to http://localhost:8080/wp-admin. This will take you to the back end of Wordpess where you can edit your webpage. You can install your WordPress Theme. Once you have done this you can add a new page and this will be where you will have the camera feeds going to.
We are going to use some Javascript for this , let s get started
<script type="text/javascript" src="https://www.securitycameraking.com/images_templ/syntax/scripts/shCore.js"></script>
<script type="text/javascript" src="https://www.securitycameraking.com/images_templ/syntax/scripts/shBrushJScript.js"></script>
<script type="text/javascript">SyntaxHighlighter.all();</script>
<script type="text/javascript" src="http://robertdev.influxis.com/videos/jwplayer/jwplayer.js"></script>
<div id="mediaplayer"></div>
<script type="text/javascript">// <![CDATA[
jwplayer('mediaplayer').setup({
'flashplayer': 'http://robertdev.influxis.com/videos/jwplayer/player.swf',
'id': 'playerID',
'width': '885',
'height': '420',
'playlist.position': 'left',
'playlist.size': '100',
'playlist':
[
      {
      'file': 'kidcam',
      'title': 'Cam 1',
      'streamer': 'rtmp://192.168.1.73:5119.$atype/',
      'image': '',
      'provider': 'rtmp',
      'duration': '300',
      'description': 'Chucks Lair'
      },
      {
      'file': 'kidcam2',
      'title': 'Cam 2',
      'streamer': 'rtmp://192.168.1.73:5119.$atype/',
      'image': '',
      'provider': 'rtmp',
      'duration': '300',
      'description': 'Techs Lair'
      },
      {
      'file': '',
      'title': '',
      'streamer': 'rtmp://192.168.1.73:5119.$atype/',
      'image': '',
      'provider': 'rtmp',
      'duration': '300',
      'description': ''
      },
	  {
      'file': '',
      'title': '',
      'streamer': 'rtmp://192.168.1.73:5119.$atype/',
      'image': '',
      'provider': 'rtmp',
      'duration': '300',
      'description': ''
      },
	  {
	  'file': '',
      'title': '',
      'streamer': 'rtmp://192.168.1.73:5119.$atype/',
      'image': '',
      'provider': 'rtmp',
      'duration': '300',
      'description': ''
      },
	  {
	  'file': '',
      'title': '',
      'streamer': 'rtmp://192.168.1.73:5119.$atype/',
      'image': '',
      'provider': 'rtmp',
      'duration': '300',
      'description': '',
      },
	  {
	  'file': '',
      'title': '',
      'streamer': 'rtmp://192.168.1.73:5119.$atype/',
      'image': '',
      'provider': 'rtmp',
      'duration': '300',
      'description': ''
      },
]
});
// ]]
</script>
You can copy paste this into your Page.
After verifying my code, it seems that some of the elements from this Javascript, WordPress does not want to play the video feed. The way I found to bypass this issue is to grab this code and bring it up in Notepad ++ create an html file called “cam.html and upload it to the root of my webpage, once it was in there its a simple Iframe html code.
<script type="text/javascript" src="https://www.securitycameraking.com/images_templ/syntax/scripts/shCore.js"></script>
<script type="text/javascript" src="https://www.securitycameraking.com/images_templ/syntax/scripts/shBrushJScript.js"></script>
<script type="text/javascript">SyntaxHighlighter.all();</script>
<iframe width="890px" height="980px" frameborder="no" scrolling="no" name="Cam" src="/cam/cam.html" style="position:relative;right: 30px;”>
Once we have done all of this we need to go back to the java script code and make sure that the IP addresses are correct. You can also use a DDNS service if you don’t have a static IP on the script for example. mydomai.dyn.com . DYN.com is a DDNS service provider. Keep in mind that they currently charge 8$ a year for this type of service. You can also get a Domain name with them for example mydomain.com and then point it to your router or PC. They have tools that will keep the Domain name with your current IP address. If you currently have a Securitycameraking.com DVR/NVR/Hybrid or Tribrid and have a DDNS with us you can use the same one, but it is recommended to use a domain name that will show a mydomain.com instead of mydomain.techproddns.com just for cosmetic purposes and customers will like this.
Here is a Generator for the code if you are an advanced user.
Once we have done all of this your webpage should have your Camera feeds and we are almost done. Here is a quick video of a mock up Day Care Webpage.
We will need to Password Protect this page so that unauthorized users cannot view the camera feeds.
The easiest way to enable password protection is by going into the page and selecting the Visibility tab on the top right corner, tick the radio button and input the password.
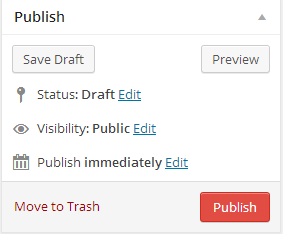
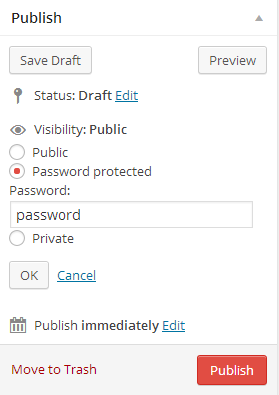
Keep in mind that this password will be used by everyone. There are other plugins that you can utilize but they are not going to be as effective as creating a file called HTaccess that will ask the user to input their username and password and you can simply edit this file with Notepad ++ and remove anyone at anytime giving them access or removing access to that user.
Lets get started with creating the .Htaccess file and .Htpasswd file.
Generator for the .htaccess
Generator for the .htpasswd
Above you will see the Generator that you can use to make your life easier.
In general what you need to create the files is open your Notepad ++ create a new file and name it .htaccess save it as Type “All Types” and this will ensure that the file is saved correctly.
Go and open the .htaccess generator and input the Name that you want to display on the pop up. I generally put something like Protected Area or Admin Only, essentially this is up to you. Once you have done that you want to input “\wamp\www\cam\.htpasswd”. You want to have the .htaccess in a folder where the cam.html is located this way when you navigate to the page it will ask for authentication. In my example here I have it in a folder called “cam” in my Wamp WWW root. Copy the generated code into the .htaccess and save.
Lets go and generate our username and password. The generator will encrypt the password and add the username for example “jose:$apr1$Wuzi1i4C$XqqOLBCXu.vH3p1627X8r.” this is really Username: jose and password: jose . Enter the username on the generator and password copy/paste the results after clicking generate and paste this on the .htpasswd file. You can add as many as you like making sure that you leave an extra line on both the .htaccess file and .htpasswd file.
Test this by navigating to the webpage, it should ask you for the password. Do not be alarmed after you have successfully gained access and when you come again to the page it does not asks you for it. Some browsers will save the username and password automatically.
Here is a video of the Final Product


