Techpro Security Products brand DVRs have a long list of pragmatic features and none of them are more useful than the ability to view your security camera footage from anywhere in the world. This is accomplished when the DVR and the network where it has been installed have been set up to correctly work together. This feature gives you the capacity to view both live and recorded video from a computer. There are a few different ways that you can do this. In this article we are going to examine performing this function through the Web Service, which uses Internet Explorer. This is probably the easiest method to set up and does not require you to install software. This is a great way to extract recorded video footage from a DVR over the Internet.
This feature gives you access to almost all of the settings that you would be able to adjust from the DVR directly, as if you were interacting with it through a monitor and mouse connected to it. You will also be able to see the live views from any of your cameras that you wish to monitor. In addition to having all the functionality of interacting with the DVR directly, connecting to the DVR through the Web Service allows you to download recorded video footage from your DVR directly to your computer.
Now we’re going to take a look at the process of getting this recorded footage from your DVR to your computer, which is fairly straight forward. Once you are logged into your DVR through the Web Service you will see a series of buttons along the top of the screen that includes the button that is marked as “search” (as shown in Image 1). Clicking on this button is the first step in being able to view your recorded footage.
Image 1
Once you have the “search” page pulled up you will first need to pay attention to the top center portion of the page. This section is labeled as “parameter”. You will need to select the date and time for the “begin time” and “end time” that will encompass the time frame of the recorded video that you are interested in reviewing. Next, you should select the camera that you want to view from the drop down menu next to where it says “channel”. This is located directly below where you entered the times and dates. You should also make sure that you have a check mark next to where it says “main stream” in order to get the highest quality of playback possible. Image 2 shows a general example of how this section should be set up.
Image 2
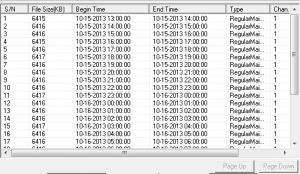
Once the “parameter” section has been set up correctly, the next step is to click on the “search” button in the upper right corner of this page (as shown in Image 3). Once you do, there will be a list of video events that will show up in the bottom portion of this page (as shown in Image 4). In order to view the video of any these events, you simply need to double click on them. This list can only hold a maximum of a hundred events. If you exhaust this list and haven’t found what you are looking for then you will need to adjust the search parameters on the top of this page to begin searching the next block of time.
Image 3
Image 4
While you are watching one of the recorded video files you will notice that there are some controls, located along the bottom of the interface, which will allow you to view the footage in the manner that you’d like to see it (as shown in Image 5). From the left, you’ll notice there is a slider bar along the bottom that will allow you to jump to different portions of the video file. As you continue this process from left to right on this bar you’ll next see the play, pause and stop buttons – the functions for these buttons are pretty straight forward. The last two buttons as you arrive at the right side of this page are the slow and fast forward buttons. Both of these buttons have multiple levels – the slow button allows for a maximum of 1/8th normal speed and the fast forward allows for a maximum of eight times the normal forward speed.
Image 5
If you ever have the need or desire to extract recorded footage from the DVR, you’ll see that this interface also offers a simple way to accomplish this process. Once you have viewed a particular video file or group of them, you will need to go back to the playback screen by clicking on the “search” button along the top of the initial Web Service screen again. Once you’re back on the playback screen, you’ll need to locate the file again and click on it, so that it has a blue bar. Then you’ll need to click on the download button in the upper right portion of this page (as shown in Image 6). When you do this it will open a browsing window, in order for you download the recorded video file to the location that you desire.
Image 6
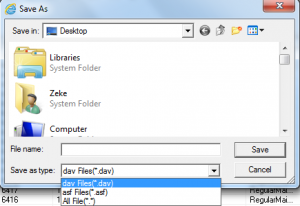
Before you actually download the video file there is one setting that you should make sure is set the way you want. This setting is in the download window and it’s marked as the “save as type” (as shown in Image 7) and it affects the type of format of the video that will be downloaded. The DAV format is the better option to select for this but it has a draw back. The good thing about the DAV file type is that it is very difficult to modify or falsify any portion of these files. The downside of video files that are formatted this way is that they will not play on most of the standard media players on a computer.
Image 7
There is an easy way around this issue. You will simply need to use the player/converter that comes on the disk which is included with your DVR and it can also be downloaded though our website. This program will allow you to play the DAV file in its original format and/or convert it to an AVI format. The AVI format is a format that will play on almost all standard video players that are available on a computer. If you should ever need to get footage to the police or an insurance company, then it is a good idea to get them a disk that has the original files in a DAV format and include the player/convertor program so that they can choose how they view it.


