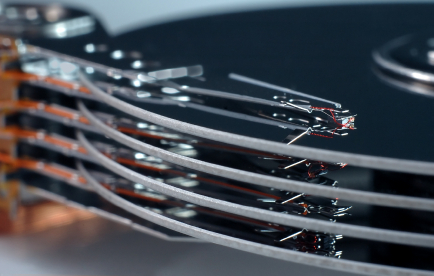
Newer and larger security hard drives are always coming to the market, and there are bound to be a few kinks that need to be worked out with performance. This article will explain, in detail, how the security hard drives work and the best configuration when it comes to getting the longest life out of your drive as possible. When you have more than one drive in a DVR/NVR, all of the data will write to just one of the drives. While the one drive is spinning and is being written to the other drive(s) lay dormant. In other words it is not spinning at its full speed or potential as the other drive is. This is causing all of the stress to be dumped on one single drive at a time, and then when the drive is full the DVR/NVR will begin to write to the other drive and the first drive will become inactive. After that it becomes a vicious cycle.
Why is this not good for the hard drives?
Well, if one hard drive alone is under a great deal of stress receiving all this information from 32 cameras for a solid 2 weeks, then it suddenly is no longer being used for the next 2 weeks, and then it is back in use it can cause issues with the hard drives. Keep in mind this is a constant cycle. The drive is full speed for 2 weeks then inactive for the next two weeks, then again full speed. Obviously, the more cameras you have the more intense this cycle becomes.
What is the solution?
In our DVRs, when you have more than one hard drive, you can group the hard drives. Say you have 32 cameras and 4 hard drives, you can set HDD groups so cameras 1-8 will record to group one which will be hard drive one. Then 9-16 will record to group two which is hard drive two, 17-24 will be group and hard drive three, and lastly 25-32 will be group and hard drive four. (See below for config instructions)
Why is this better for the drive, and how does it prolong its life?
What this does is it divides the stress on all the drives instead of having one drive do all the work for 32 cameras constantly. This ensures smooth constant use of all the drives. They are working together, have less stress, and there is no up and down process so they will all be constantly working together and doing half the work in the long run.
Now that we have covered the grouping, let’s dive into configuring these hard drive groups. For this demonstration I will be using an older model NVR we have here that we no longer carry but the process will be the same with the black interface. I will also be demonstrating the new blue interface at the same time.
Once the DVR is set up, all cameras added, and all hard drives installed the first thing you want to do with the older Interface system is log into the machine and go to the advanced tab and find the HDD Manage Icon. Once in HDD manage find “HDD Setting”. This is where you will configure the groups. For the blue interface (newer Interface), you need to get in the main menu and look for “storage” in the bottom row. Inside storage you will go to advanced on the left side of the screen, that first tab labeled “HDD” is where you will set up the groups. If there are no hard drives connected it will not let you change the hard drive for that group. These pages should look like the first picture for black interface and the second for the blue interface.
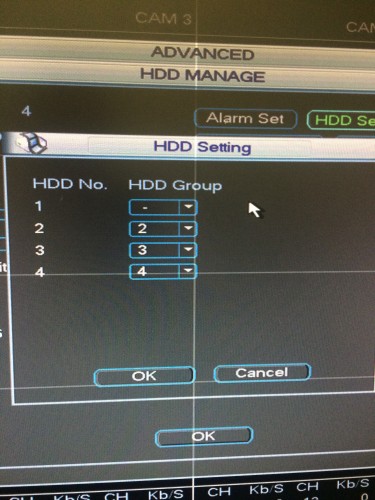
Black Interface
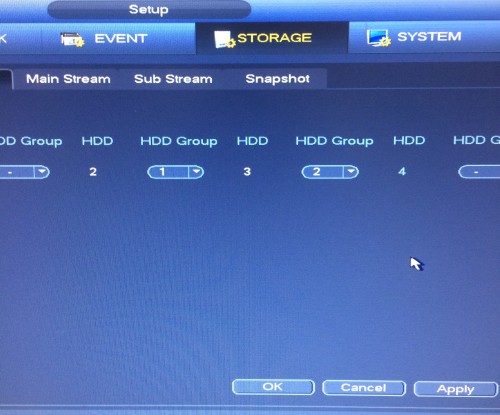
Blue Interface
Once you save these configurations the DVR/NVR will require to reboot. Once this is done you need to set each channel to the group/HDD it will be recording too.
For the blue interface you just need to select the “Main Stream” tab just next to the “HDD” tab you were just in. There you will assign a group/HDD to each channel and that is the HDD that camera will continuously record too. This should look like the second picture below. For the black interface you must go into HDD Manage again and choose “HDD Channel”, this is where you will assign the HDD/group for this interface, it should look like the first picture below.
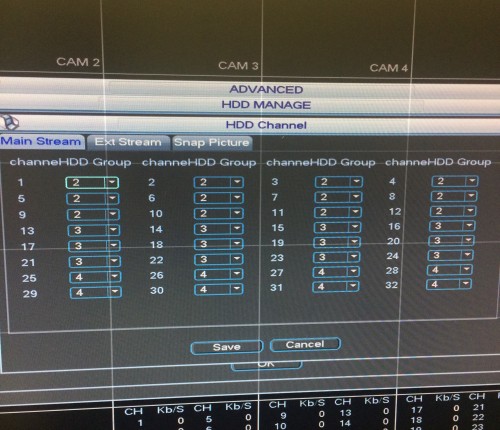
Black Interface
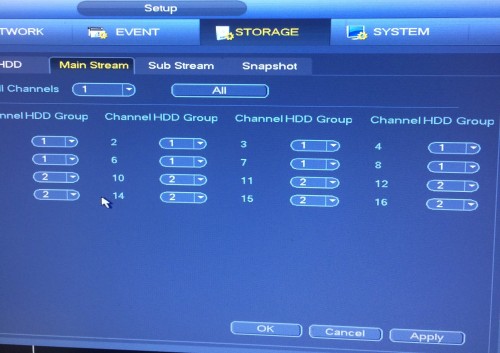
Blue Interface
As you can see in the black interface I have 3 different hard drives connected HDD 2, HDD 3, and HDD 4. I have cameras 1-12 recording to HDD 2, cameras 13-24 recording to HDD 3, and cameras 25-32 will record to HDD 4. In the blue interface I have 2 HDD’s connected, HDD 1, and HDD 2. Cameras 1-8 are recording to HDD 1, and 9-16 recording to the second drive. Again this will make the hard drives all work together all of the time and divide up the work like a well organized work crew. Keep in mind that you can do the same thing with the sub stream, if you need to record to the sub stream, and the same goes for snapshots from the cameras.
The beauty of this setup is when you need to go find footage, absolutely nothing changes. You will NOT have to specify a certain drive or group to find the footage of a camera. The drives are working as one in a sense so when you search in playback it searches through all the drives and finds the correct file. To me it is a no-brainer and I configure all of my clients DVRs this way when I deem necessary. When I say “Necessary” I mean any situation where there is more than one drive. To me, makes no difference the amount of cameras, I see no reason why the drives should not work together as a whole. All it does is improve performance in your drives and make them last longer for you. Please understand this is in no way a guarantee that your drives will not fail, they are electronics that is inevitable, but I can tell you that it will improve the way the DVR runs and the drives perform. All in all, making your system that much more reliable. Also, let me say that if you need any help please feel free to give me a call at my desk at (561) 948-2614, Ext. 124! You can also post your question to our Online CCTV Forum.
Good Luck, Take care!

