Difference Between The DVR Main stream and Sub Stream
In this video I will show you the difference between main stream and extra stream or sub stream on your DVRs for IP cameras. So for this demonstration I will use a 16 channel mini-HD this unit has pretty much the same interface for DVR Main stream and Sub Stream as all of our DVRs and our IP cameras.
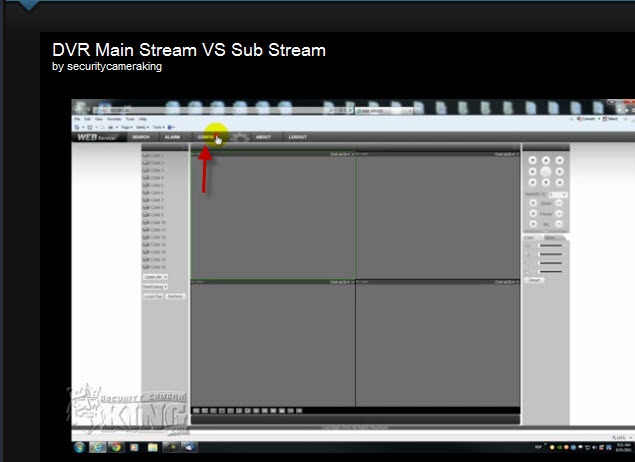
So I am going to log into it and go to “Config;”
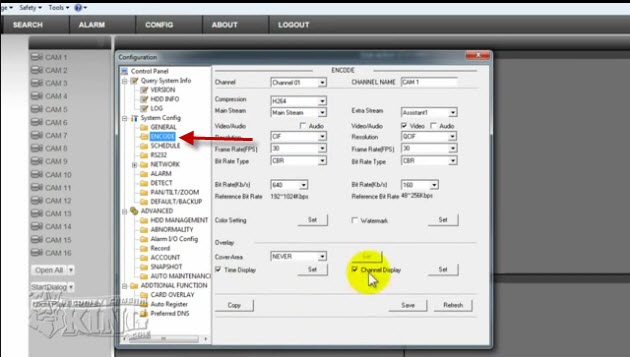
and on this left column menu go to “Encode.”
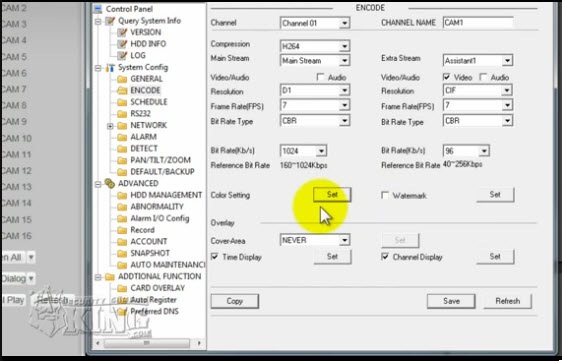
This is the interface where you are going to configure how the DVR is going to be recording, the resolution, the frames per second, and the bit rate and how much bandwidth each camera is going to be pulling from your network.
Other options include enabling audio (if you are going to use a camera with audio this is where you enable it), you can add a watermark so that no one can tamper with your footage, color setting to adjust the color. In the upper right corner is a field called Channel Name, this is where you can name your camera anything you want, and to begin this demonstration I am going to explain the main stream.
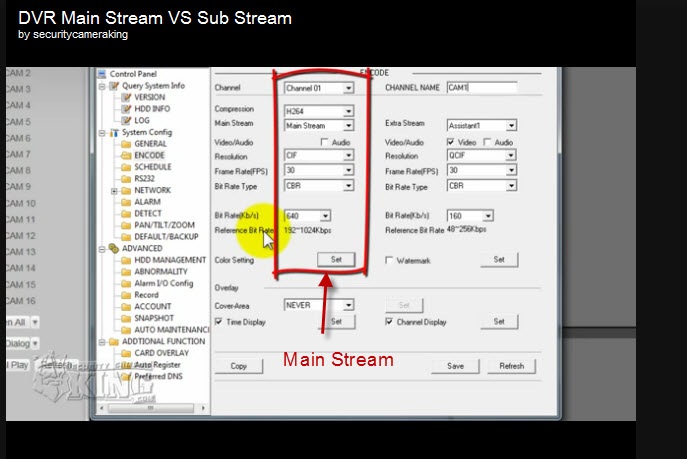
This option is mainly how the DVR is going to be recording, what resolution it’s going to be recording at, how many frames per second, and what bit rate or bandwidth it’s going to be pulling from your network.
By default, the DVR will come configured as you see here. For the main stream, you are going to be configured at CIF, 30 fps, and the bit rate type will be CBR (which is Constant Bit Rate), and the bit rate is going to be about 640 kilobits per second.
The resolution, CIF, is acceptable but the DVR can be configured for D1 on channel 1 or channel 9 at 30fps. The Ultimate series DVRs and the new Hybrid DVR are able to record at D1 on all of their channels. The Hybrid DVR can suport 20 cameras; 16 that are analog and 4 that are digital. The four that are digital can support 1080p resolution. The remaining 16 analog channels can all be configured for D1 recording at 30 fps simultaneously.
We recommend that for our other DVRs you can configure them at D1 on every channel as well but they can’t support that resolution with a frame rate of 30 fps. So we recommend that if you want D1 on all of those channels that you change the frame rate to 7 fps. At this rate the footage will not be as fluid as D1 at 30 fps but it is still a decent recording. Remember that the Ultimate series and the Hybrid DVR can record D1 at 30 fps on all channels.
For the bit rate setting, we recommend CBR and the reason why is because it’s Constant Bit Rate, it’s always going to allocate the amount of bandwidth you have set under the Bit Rate. If you configure this as VBR or Variable Bit Rate,
the DVR will allocate more bandwidth to any objects that are moving. When it notices something is moving it will zoom in on the object and this will allow the DVR to allocate more bandwidth, which ultimately will degrade the other camera’s pictures. You always want a constant good quality picture so that is why we recommend a constant bit rate. Speaking of bit rate, this should be set as 1024 because the greater the bandwidth the camera is allocated the better the quality of the video. If you have lower resolution or bandwidth on your network and you want to watch the videos on the main stream (which is not recommended), you can do it but it is not recommended. You are going to have to lower this down, if you don’t have a strong network; especially when you try to view the cameras remotely. For example AT&T DSL is not as fast as cable so you will probably have to lower down the bit rate. But remember, the lower down the bit rate the lower the resolution (and quality) of the picture. So we always recommend the main stream settings to be: 1.) D1; 2.) 7fps; 3.) CBR bit rate type; and, 4.)1024 bit rate for this particular DVR.
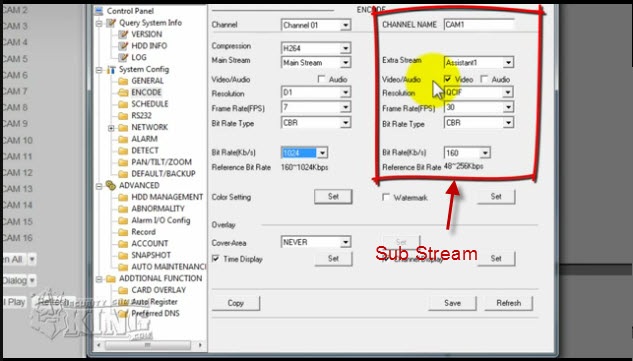
This is your sub stream:
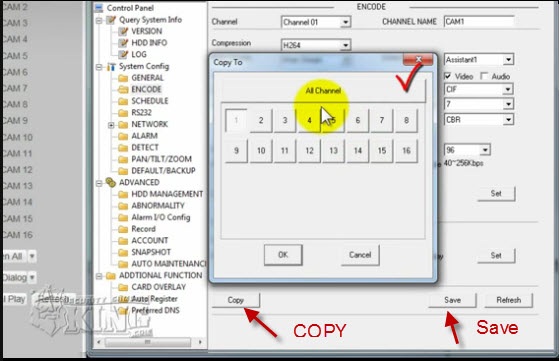
This is what you’ll use to view your cameras using your iPhone or other smart phones; you will use this configuration. One thing you have to make sure you have setup correctly is the resolution. Right now it is at QCIF and I need to change it to CIF. QCIF will yield a poor quality video; it will be pixilated when you view it on your smartphone. We recommend a Frame Rate of 7, which you cannot go higher than because this is the sub stream. Again the bit rate type should be CBR, but you can lower the bit rate to 96.
Remember this is not going to lower your resolution because the main stream is for recording and the sub stream is for viewing.
You can copy this to all channels, click “OK,” and click “Save:”
Now if you want to configure something like the Color Setting this is a per camera basis.
Let’s say you want to increase the brightness of just camera number 1. You’ll have to go to Channel 1 then under Color Settings click “Set”:
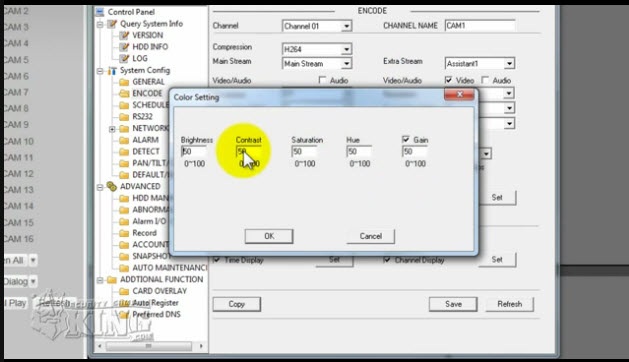
and the Color Setting menu will pop up
You can then increase the brightness by typing in a higher number in the brightness field. That will affect just that particular channel and not all the cameras. Even if you copy and paste it will only affect that channel.
Another thing you can do here is the time display. You can move the time display to anywhere you want on your screen.
Here the cover area, you can cover some of your video image with a mask. Let’s say you have a door in your picture that you do not want people to see, you can cover that area so it won’t be seen when viewed on the DVR. Once you click “Set” you will be able to click and drag a shape where ever you want on the channel screen here which also will pop up.
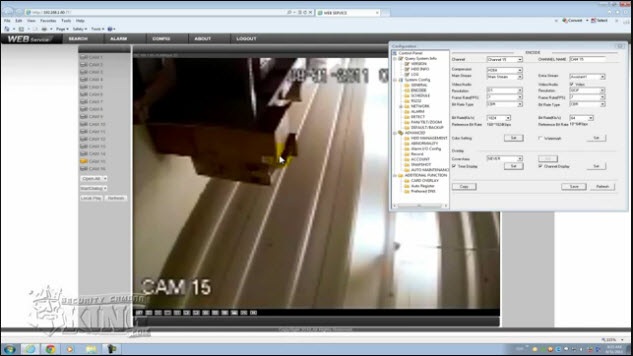
Let me show you. I have a camera plugged in on channel 15. I will demonstrate by going to Cover Area, monitor, Set. Here for example suppose I have a place here that I don’t want anyone to see. You just click and drag with the mouse and this will be masked at the DVR, but the video image that is being saved will not be affected; it will contain the full, unmasked image. If you want to get rid of the cover or mask, on the monitor image click “Clear” and it will be removed. Now I’ll save my configurations.
So you see, on channel 15, the DVR is recording at D1, 7 fps, CBR, and 1024 bit rate. If you look at my Camera 15 in the very upper left hand corner the values are changing. If you see here, it is going to be increasing. As I said before, it depends how the network is, it’s not going to go below or above it.
Now if you look at the resolution it is decent. Now if go over to Channel 15 and click on the little drop-down arrow to the right you will see Main Stream and Extra Streams. Click on Extra stream and you will see the resolution that I set which was CIF at 7. You’ll notice that this picture is not as high quality as the one before; it looks a little bit fuzzy and the reason why is because of the resolution I set.
If I change the sub stream to QCIF it will be a very bad image, very pixilated and somewhat blurry. So remember that the Ultimate and Hybrid DVRs can record at D1 and 30 fps and the other DVRs can record D1 at 30 fps on channels 1 and 9. We recommend that you use D1 and 7 fps for those DVRs that cannot record D1 and 30 fps on all channels and that the sub stream be set to CIF and 7 fps.
I hope this has been informative for you and I would like to thank you for viewing it.

