When you first open up your system you may find yourself asking, “How do I connect all these wires and connectors?” As the surveillance industry grows and develops, so to do the methods of recording. Each different type of system has its own somewhat unique type of CCTV cable and/or connector. Today I’d like to break down the different cable types and how to terminate the appropriate wires that come with your system. But, before we begin, it is important to note that most of our products come with a lifetime of tech support and this service is invaluable to the end user. We highly advise contacting our tech support if you are unfamiliar with any part of the installation process. There are also un-boxing videos under virtually every product in the video tab. This will allow you to get an idea of what the product is and what type of connections it has on it.
So, what are the different types of CCTV cable and connectors? Before we go into how to connect each system, we need to understand what the different types of systems are. Let us break down the 3 main types of systems: traditional Analog, IP and HD-CVI. An IP (Internet Protocol) system operates around an NVR (Network Video Recorder) and utilizes Cat5/Cat6 (Category 5 or 6) cable and connections, and generally receives power via a POE (Power Over Ethernet) switch. While an Analog system utilizes Siamese cable (Coaxial cable with BNC connectors for video and 18-2 for power). An HD-CVI (High Definition Composite Video Interface) system utilizes the same type of cable as an Analog system but a higher grade of cable is generally recommended to accommodate the quantity and quality of data being transferred over the cable. To find out more what HD-CVI is check out our page “What is HD-CVI“.If you are unsure about which quality of cable to buy, feel free to contact our sales department and they can help you choose the best cable for your situation. Now that we know the different types of systems and their respective cables we can begin to discuss how these connections and connectors go together.
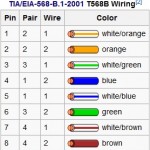
The first major system we discussed was IP, so let’s start there. IP systems utilize Cat5/Cat6 Ethernet connections as we mentioned before. When you receive this cable in a spool it does not come terminated so you will have to place the connectors on the ends, after of course, you’ve cut the appropriate length. The process for terminating CAT5/CAT6 is relatively simple. It is important to note that a Crimper tool is necessary for this process. There are two common wiring standards for CAT5/6 “TIA/EIA-568-A” and “TIA/EIA-568-B”. For our example we are going use the B standard. While this is common it may be a good idea to check which method will work best for your ideal use. The first step is to strip the shielding to expose the wires. You should strip about three quarters of an inch to have sufficient room to adjust the wiring pattern. The Color code should be as follows: white/orange, orange, white /green, blue, white/blue, green, white/brown, brown. Once you’ve arranged the wires appropriately all that’s left is to insert them into the RJ-45 jack and crimp locked. It is advised that before crimping the jack locked you ensure the bare wires are properly connected to the jack. For your convenience here is a brief video demonstrating the above description. Once this is completed test the cable by connecting two devices already known to be configured properly to ensure the cable is properly terminated.

https://www.youtube.com/watch?v=GM5pUHTeMSs
This brings us to Analog systems. Analog cable is relatively simple however there are several types of BNC connectors you can attach to the cable. Three types to be specific, these three types are twist-on, crimp-on and compression. Twist-on is the most common and easiest to install. Crimp-on holds a slightly tighter connection but requires the correct tool and a bit of knowledge. Compression is the tightest, but also the most difficult and slightly more expensive.
https://www.youtube.com/watch?v=5Ez0BV3jChU
Above is an example of a twist-on type connector, which is easily twisted on once the cable is cut and stripped to the appropriate length. Be sure the center most part is inserted all the way through the inside of the connector. Also, a small amount of mesh should be folded over the lip of the rubber shielding. This will act as somewhat of a ground for the cable. Next is an example of crimp-on type connectors.
https://www.youtube.com/watch?v=G2x_xM6cP2A
Crimp-on connections offer a slightly more secure type of connectors. While allowing a somewhat inexperienced user a relatively simple install. The disadvantage to crimp-on connectors is they should be utilized with a special tool. On a small install this might be unnecessary. This leads us to the final type of BNC connector.
https://www.youtube.com/watch?v=_330Vcg7H94
The final type of BNC connector is the Compression type fitting. The compression type fitting is the most secure, but is also the most unforgiving. If the tool is misaligned or inappropriately secured a wasted fitting will cost you more in addition to the specialized tool required for the job. These fittings are often used for large installs or areas where the cable may be in a somewhat unforgiving environment.
https://www.youtube.com/watch?v=iH8ob73x-V4
The final part of an Analog cabling are the power connectors on the camera side of the Siamese Cable. These connectors are simply twisted on after the rubber is removed. Once the pair is twisted to its corresponding color it is simple matter of covering the exposed wire with a gel cap.
The last system we offer, HD-CVI, is, for cabling purposes almost exactly like Analog. The only difference is a higher quality cable is recommended under ideal situations. The amount of data being sent in an HD-CVI system is exponentially larger than that of traditional analog systems. As odd as this sounds in terms of physical installation there is, again, virtually no difference aside from the thickness of the cable. This often increases so that less interference reaches the line. This allows that large amount of data to flow with less chance of interference or breakdown over distance.
So, as daunting as it all appears at first, the cabling portion of your install is relatively simple. And when you factor in our experienced techs and lifetime tech support, you should never feel overwhelmed by a perspective install!
