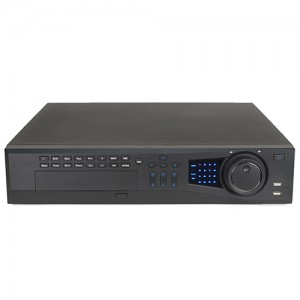
 When it comes to Spring Break, Americans are often traveling, sometimes it is just over the river and through the woods to Grandma’s house and other times it is across the country. I don’t know about you, but for me when I leave it is nerve racking wondering if my house is protected. So, I installed a Tech Vision DVR security camera system with several cameras on the outside as well as on the inside of my home. This gives me peace of mind knowing that I can pick up my phone at any time and look in on my home as well as receiving alerts from my DVR about motion that isn’t supposed to be there.
When it came time to get a security camera system, I did a lot of research trying to find a system that I would be able to not only see my system remotely, but also offer the applications and support necessary to do so at no additional cost. I came to find that Tech Vision DVRs have the best features and support out of anything on the market. The initial setup of the system was fairly straight forth, I needed a little technical assistance from Techpro but they came through with flying colors. One of the most complex things to set up with my system was the port forwarding on my router. This is done so that you can communicate outside of the network with the DVR unit. What I had to do was to login to the router at my home and configure a few settings. In order for my DVR to be able to communicate with another computer, I needed to forward the http port which is generally port 80. In order for my smartphones, tablets, and remote viewing software to communicate remotely I had to forward port 37777 and port 37778. If my router would have had the capabilities to, I could have just put the DVRs IP address in the DMZ (demilitarized zone) of the router and completely skipped the port forwarding steps. This is a much simpler method, but not all routers have the capabilities to do this.
Now that I have configured the DVR and the router, I am ready to set up my computer, phone, and tablet to remotely view my home camera system. When it comes to my computers, I have a mixture of Mac and Windows based machines. With the Mac machines I use the free software that comes with my DVR called PSS (Pro Surveillance Software). This is great because I can put several different units on one piece of software. The configuration is pretty straight forth, I followed the setup steps on the support.techprosecurity.com website that was for my operating system. Once the program was loaded, I went to the Config Manager, selected the Device Manager section. A pop up window comes up and I selected the Add button. Then I put in a Title and Description of the unit. I had to put in the external IP address of my home, the easiest way to figure out your external IP is to have a computer on the same network and google what is my IP. I left the port the default 37777, changed the Type to DVR, put in the Username, and password twice. Once you have done this you will hit save. Then you will go up and select Device List, then select DVR, and double click on the Title that you gave your DVR to login to the unit. From there you will want to select a screen to put your first camera selection, and continue adding cameras until you have all you want. It is that easy and the software is completely free. These are the same steps that you will do on a Windows based machine as well.
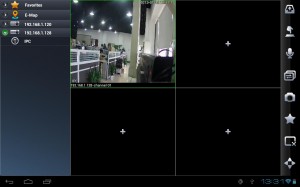
 With configuring my iPhone, I had to go into the App Store on my phone and search for the TechproSS application. There were two different applications that came up, the Lite and Plus, the Lite version is the free version for remote live views of the DVR and the Plus version offers the ability to do playback of footage. I went with the Lite version, due to it being a free software. Once it was downloaded, the configuration was very similar to that of the PSS software. I opened the program up and went to the Device Manager, then selected Add. In here I named the DVR location something that would trigger where it was. In the Address I put in the external IP address of the DVR location, leaving the Port the same, putting in my Username and Password. Then after I saved the configurations, I was able to select the Home button and then select the Real-time Monitor selection. In here the screen will show up with four different squares with a plus sign in each, you just hit the plus sign in a square and select the camera that you want to show up in that screen. You will repeat this for the following screens. What I did was after I selected four cameras, there is a Star at the bottom of the screen, I hit that and gave these four cameras a name in the favorites. I then selected four more cameras and hit the Star again with a different name. I did this so that instead of always having to go in and select the cameras individually, all I have to do is to roll the wheel at the bottom of the screen and it will automatically pull up my favorites. The cool part about this application besides being able to see my cameras from anywhere in the world that I have reception is that I can add multiple DVRs to it and select which cameras from different DVRs and see them all on the same application. The iPad app is the same name with the same setup configurations as the iPhone app, the main difference is that on the phone you can only see up to four cameras at a time and on the iPad you can see up to sixteen different cameras all simultaneously.
 There are a lot of different DVR manufacturers out there with remote viewing software, but I have found that there are none out there that offer the range and support that Tech Vision DVRs offer. Every step of the way I was able to either go onto securitycameraking.com and checkout the videos section under their CCTV Learning center or call into their Tech Support Department to get help through the setup of my DVR. Sometimes I had to wait a little bit for technical assistance, but it was far better than other companies who outsource their support to people who really have no clue but to ask you the FAQs that they are given. Since my initial setup at my house I have done all of my families DVR installs and configurations with Tech Vision DVRs and have not had one ounce of problems that couldn’t be resolved with the tech department’s help. I will continue to use and rave about Tech Vision DVRs with anyone that is looking for a high quality well support machine. In my personal opinion, there are no better machines on the market at the price points you can get these. That with all of the free remote viewing and mobile viewing software that these units include, you would be foolish to try and go with another product just to save a buck.
