Now that we have the passive FTP server completely set up and working, we can begin utilizing it. Next, let’s begin by going ahead and adding a digital video recorder to it. Below is a short guide on how to connect an Elite Series recorder to an FTP server. In case you missed it, be sure and check out the previous article on how to set up an FTP server using FileZilla. There you will learn to create a passive FTP server in FileZilla, which will be necessary to begin the steps in this guide. Once you’re ready, follow the steps provided below or follow along in the video found at the bottom of the article.
How To Connect An Elite Series Recorder To An FTP Server
Step 1: Enable FTP
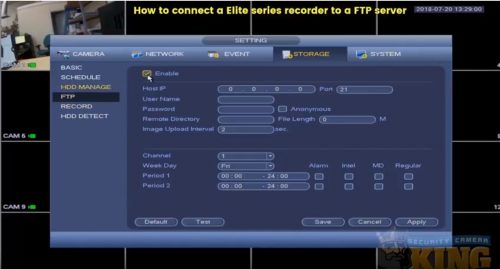
Begin by going to the local interface of your Elite Series recorder. First, open the main menu by right-clicking inside the interface and selecting Main Menu. Then select the Storage option found under settings. Next, go to FTP and locate Enable, found at the top of the menu. Select the box to enable the FTP server.
Step 2: Image Upload Interval Test
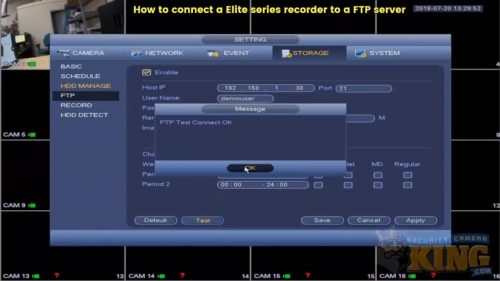
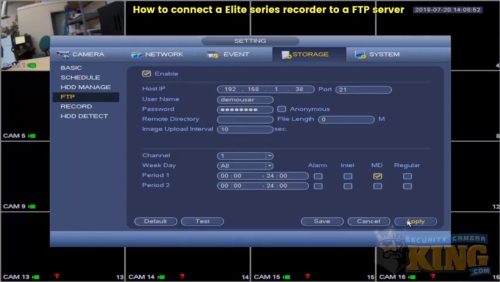
Once the FTP server is enabled, go ahead and enter the Host IP address. This is the IP address of the recorder that the FTP server is set up on. Next, enter in the correct User Name and Password. For the purpose of this example, the User Name will be Demouser and the Password will be admin123. Now change the Image Upload Interval (set at 0 by default) to 10 seconds. The rest of the settings can remain as they are found by default, which means leave each of the boxes unchecked (since we are only going to be sending snapshots to our FTP). Select Apply. Now select Test and make sure the message reads FTP Test Connect OK. Then select Apply and Save.
Step 3: Enable Snapshot
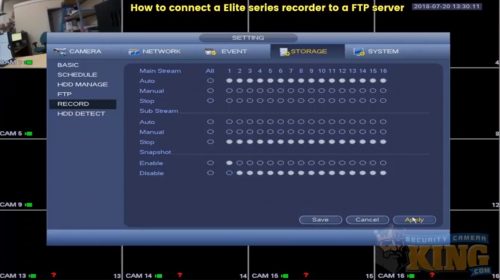
Now go back to the Main Menu and go to the Storage option. Next, go to Record. Now we will enable Snapshot on Channel 1. Once you’ve selected Enable 1 under Snapshot (the rest should all be lined up beside this selection), click Apply and Save.
Step 4: Enable Motion Detection
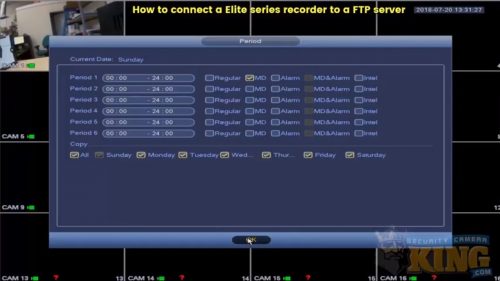
Go back to the Main Menu and select the Storage option. Next, go to Schedule. Now we are going to set out Snapshot Schedule based off of motion. Select Snapshot, found at the top next to Record. Next click the settings wheel for Sunday, found on the right side. Regular should already be checked. Click the box next to MD to enable motion detection. Now uncheck the box next to Regular. Then click the box for All to enable motion detection for all days. Select OK to apply. Then select Apply and Save. Go to Recording again and select Apply and Save.
Step 5: Enable Motion Detection Continued
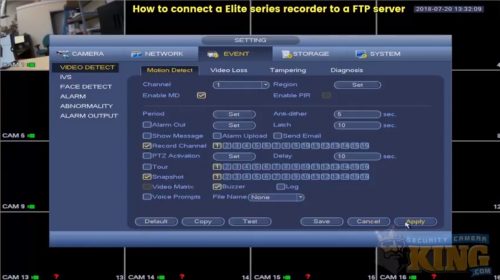
Go back to the Main Menu and select the Event option. Now we are going to enable motion detection for a Channel 1. Click the box next to Enable MD to enable motion detection. Next, enable Snapshot. Then click Apply and Save.
Step 6: Triggering Snapshots
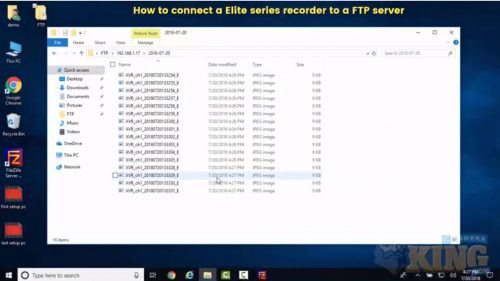
Now we are going to connect to our computer. Select and open up FileZilla by right-clicking the icon and selecting Run As Administrator. Once it opens, you will see that it’s now disconnected. Now open up the FTP Folder. Next, we will create some motion at the camera to witness the snapshot files being put in the FTP Folder. You should see the snapshots that were triggered based on the motion.
Step 7: Sending Video to FTP
Now we will go ahead and go over the settings on how to send video to your FTP server. Open up the Main Menu and select the Storage option. Go to FTP settings and change the weekday to All. Next, select the box under MD to enable motion detection for Period 1. This is also where you can enable alarm, intel, and regular. Select Apply and Save. Then go back to Event settings and make sure Enable MD is checked in the Video Detect category. Now go back to Schedule and repeat step 4 to apply for both Record and Snapshot.
That completes the guide on how to connect a recorder to an FTP server. Follow along with the video tutorial provided below if you are having any problems.
Visit the Video Vault anytime on our website to watch more video tutorials and new product demonstrations. If you have any other questions, contact Security Camera King for further assistance.
Facebook | Twitter | Google+ | YouTube

