Being a Technical Support representative can give you a lot of insight into the everyday obstacles and frustrations that a security system installer may run into when setting up a location.
For older analog camera systems, getting set up on a LAN (Local Area Network) and providing remote access to the DVR was a pretty straightforward task. In most cases, all you had to do was give the DVR an IP Address and set up port forwarding and call it done. Ah…the good old days.
Now that we have entered the 21st Century, security camera systems have changed. Analog systems have become more robust, delivering images at 960H resolution at 30 frames per second across 32 or more channels, and sometimes along with audio as well. These improvements alone have created the necessity for more bandwidth on both your LAN and your Internet connection to provide a remote view that flows reasonably well and doesn’t just ‘drop out’ all the time.
Now, as IP cameras and systems become more and more prominent, the need for a well tuned network becomes even more necessary. Megapixel cameras can put a pretty heavy load on your LAN to the point where your other work related functions can start to suffer if you do not have enough bandwidth available. The need to upgrade from a 10/100 (100 Mb) LAN to a 10/100/1000 (Gb) LAN becomes obvious pretty quickly when you have 10 or more Megapixel cameras. For example, some IP cameras come out of the box with a high bitrate 6000 kbps ~ 8000kbps and CBR.
6000kbps is roughly equal to 6Mbps (6 megabits per second) and 8000kbps is roughly 8Mbps. CBR means Constant Bit Rate. That means one of those cameras at 8000kbps will be using 8 megabits per second of your available bandwidth regardless of the scene complexity. If you have 10 of those cameras on your LAN, you will be hitting 80Mbps. That is 80% of your total available bandwidth, and that is a point where you’ll begin to see visible slowdowns and transmission errors on your LAN.
The solution to that problem is to move to a 10/100/1000 (Gigabit) LAN. Gigabit LAN is 10 times faster, so your 80% utilization becomes 8%, a much more manageable percentage.
This brings us to today’s standards. Nowadays, you will see NVRs (Network Video Recorders) more and more as the quest for a better image progresses. As the megapixel resolution increases, so does the strain on your LAN from increased bandwidth requirements.
To offset this issue, most NVRs now come with two separate LAN connections. Some have a single LAN connection and a number of POE ports (Power Over Ethernet). In either case, your NVR is ready to communicate on two different subnets. The LAN connection will connect to your LAN subnet and will be used to view the NVR remotely, send email alerts, etc. The second LAN connector and/or the POE ports will be on a different subnet (Different IP address range). This allows you to isolate the cameras from your LAN and keep that traffic to a minimum.
This is where a little discovery and pre planning will help you avoid a huge headache in your security camera installation.
When you have two subnets connected together by a single device, those subnets must be different. You’ll see this on a router more often than anywhere else. A router connects two networks together. Your LAN (Local Area Network) and the Internet or WAN (Wide Area Network). The router’s main function is to translate the communications from one network to the other. If both networks have the same range of IP addresses – well, you can see where that would be confusing to the router. It would not know which direction to send your signal, and would have at least two choices for the same IP address. Routers are not capable of ‘critical thinking’ or ‘reasoning’. They do what you tell them and if you give them conflicting information, they just refuse to do anything at all. Just know that if you have a device that connects to two different networks – those two networks must have different Network Ids. (IP address ranges)
The reason I have explained all of that is because if you have an NVR with two LAN ports, or an NVR with a LAN and 4 or more POE ports, that NVR is acting like a router. It is important to understand the LAN 1 and LAN 2 ports are separate networks. The LAN port and POE ports are also two different networks. Since we know that the two networks must have different IP addresses, it becomes necessary to identify the existing LAN subnet BEFORE you set up the camera subnet. If you set up all of your cameras on a 192.168.0.xxx Network ID on the camera LAN, and then discover that the site’s existing LAN is also 192.168.0.xxx, guess what? You have created a duplicate Network ID. You will need to re-address every camera on the secondary LAN and reset the secondary LAN to a different Network ID.
SO…How do you avoid this?
The answer is ‘discovery’ and fortunately is pretty quick and simple to do. You will need to be on a PC that is connected to the existing LAN.
On your Windows PC keyboard – locate the Windows ‘Flying Flag’ key between ‘Ctrl’ and ‘Alt’ on the lower left.
Press and hold that key, then press ‘R’ one time. This will produce a ‘Run’ prompt. (this works on every version of Windows, even Windows 10)
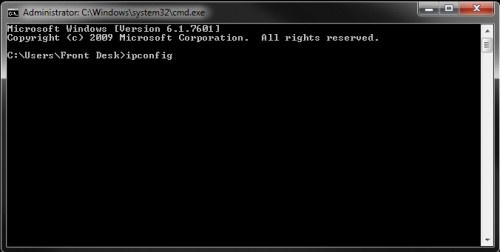
In that prompt, type ‘cmd’ (without quotes) and press ‘Enter’.
This will produce a ‘Command Prompt’ (a black DOS box with white letters)

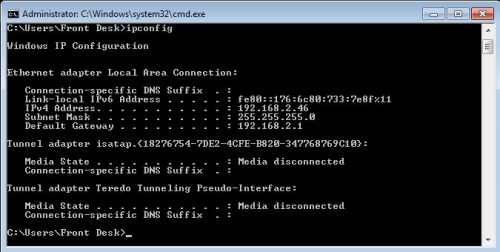
This will produce a sometimes lengthy list of your adapters and their IP Addresses.

This is your current IP Address on the LAN, and the ‘Gateway’ should be your existing router.
Look at the first three sets of numbers (octets) – those represent the current ‘Network ID’.
Those are the numbers that you do not want to duplicate on the camera LAN.
To avoid potential conflicts, you can change only the third octet (third set of numbers) or you can use something entirely different.
If your existing LAN is set to 192.168.1.xxx – you could change to 192.168.2.xxx, or something entirely different, 10.xxx.xxx.xxx would work as well.
Since the camera LAN is a ‘closed network’, meaning it has no direct connection to the Internet or any other network, you could actually use just about anything
as a LAN ID. It is always better to stick with known conventions however, since you never know when the infrastructure might change and you’ll need to be compliant with standard networking rules.
Try to stay within these guidelines =
192.168.0.0 ~ 192.168.255.255 (Class C address range)
172.16.0.0 ~ 172.31.255.255 (Class B address range)
10.0.0.0 ~ 10.255.255.255 (Class A address range)
If the location you are installing the NVR in does not yet have a LAN setup, then you obviously can’t do any discovery.
In that scenario, try to ‘best guess’ an odd network ID for the camera LAN. The most common Network Ids in use are =
192.168.1.xxx / 192.168.0.xxx / 10.1.1.xxx / 10.1.10.xxx / 172.16.xxx.xxx , so as long as you stay away from those, you’ll probably get lucky.
My personal favorite is using a ‘Zero Config’ address. This is the 169.254.xxx.xxx range. That range almost guarantees that you won’t have any conflicts because it is not a valid internal or external range, and therefore you should never encounter a network using that ID.
So, to put it in a nutshell, find out what the customers existing LAN is BEFORE you address the cameras. Then just make sure you are not using that same range for your camera LAN.
At any point, if you run into a question you can’t figure out, give us a call at the TechPro Security support line. Our technicians can help with just about any network issue you run into, and if you can get to the Internet, we can remotely log in and help you with the installation.
Happy Networking!
