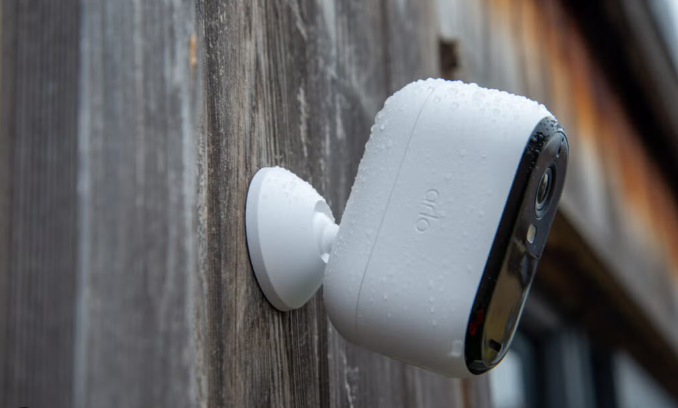
Mounting an outdoor camera can significantly enhance the security of your property by providing constant surveillance of key areas. This guide will walk you through the process, from selecting the right camera and tools to proper installation and maintenance.
Selecting the Right Outdoor Camera
- Consider Camera Features: Choose an outdoor camera with features like weather resistance, night vision, high resolution, and wide field of view.
- Wired vs. Wireless: Decide between wired and wireless cameras. Wired cameras offer a stable connection but require running cables, while wireless cameras offer easier installation but rely on a stable Wi-Fi connection.
- Power Source: Determine the power source for your camera. Options include battery-powered, solar-powered, or wired to an electrical outlet.
Gathering Tools and Equipment
- Camera and Mounting Kit: Ensure you have the camera and any mounting hardware provided in the kit.
- Drill and Drill Bits: A drill with the appropriate drill bits for your wall type (e.g., masonry, wood, or metal).
- Screws and Anchors: Screws and wall anchors suitable for the surface where you will mount the camera.
- Screwdriver: A screwdriver to secure the screws.
- Ladder: A ladder to reach high areas safely.
- Cable Clips or Conduit: For managing and concealing cables if you’re using a wired camera.
Installation Steps
- Choose the Mounting Location: Select a strategic location for your camera, such as near entrances, driveways, or other high-traffic areas. Ensure the location provides a clear view and is within reach of a power source if needed.
- Mark the Drill Holes: Hold the camera mount against the wall and mark the positions of the drill holes with a pencil. Use a level to ensure the mount is straight.
- Drill the Holes: Using the drill and appropriate drill bit, drill holes at the marked positions. If mounting on masonry, use a masonry bit and insert wall anchors.
- Attach the Mounting Bracket: Secure the mounting bracket to the wall using screws and anchors. Ensure it is firmly attached and level.
- Position and Secure the Camera: Attach the camera to the mounting bracket and adjust the angle to cover the desired area. Tighten any screws or fasteners to hold the camera in place.
- Connect Power and Cables: For wired cameras, run the cables to the power source and connect them. Use cable clips or conduit to manage and conceal the cables. For wireless cameras, ensure they are connected to your Wi-Fi network.
- Test the Camera: Power on the camera and check the live feed to ensure it covers the desired area. Make any necessary adjustments to the angle and settings.
Maintenance and Tips
- Regular Inspections: Periodically check the camera feed and performance to ensure it is functioning properly.
- Clean the Lens: Clean the camera lens regularly to maintain clear video quality. Use a soft cloth and lens cleaner.
- Firmware Updates: Keep the camera’s firmware up to date for optimal performance and security.
- Secure Cables: Ensure all cables are securely fastened and protected from weather and potential tampering.
Related Products
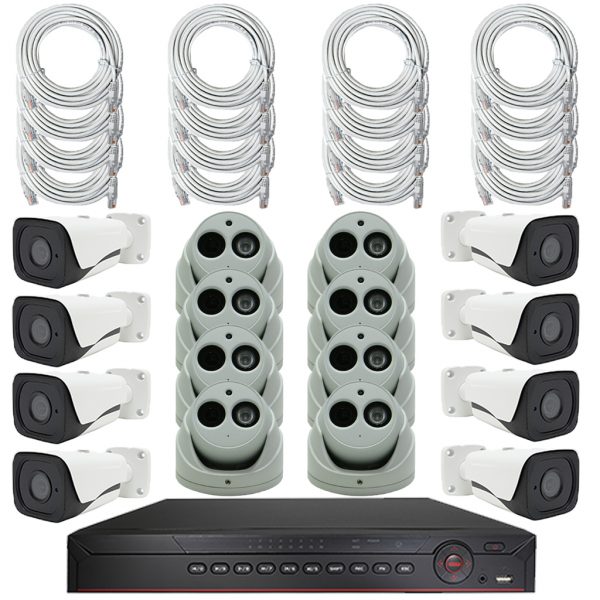
16 Channel NVR with Eight 8MP Dome Cameras & Eight 8MP Bullet Cameras
Specifications
- Recorder: NVR-ELE16M-16P4KV2
- Number Of Cameras: 16
- Number Of Hard Drives: 2
- Size: 1U
- Resolutions Capable: 8MP / 6MP / 5MP / 4MP / 3MP / 1080P / 720P / D1 & etc.
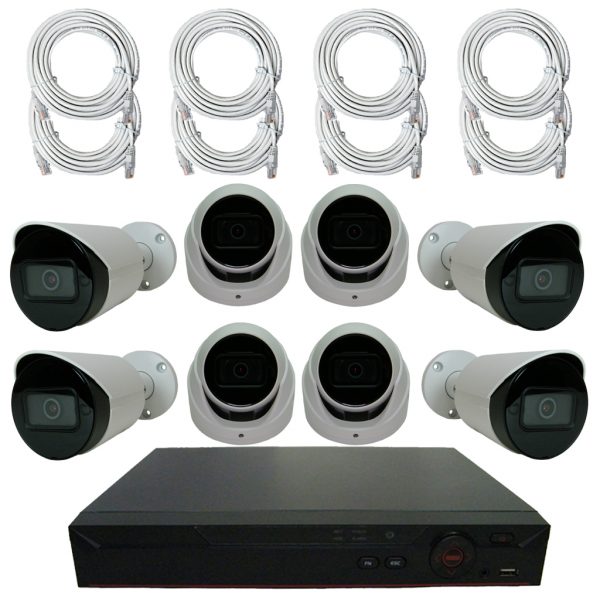
8 Channel NVR with Four 4MP Dome Cameras & Four 4MP Bullet Cameras
Specifications
- Recorder: NVR-ELE8-PS
- Number Of Cameras: 8
- Number Of Hard Drives: 1
- Size: Mini 1U
- Resolutions Capable: 8MP / 6MP / 5MP / 4MP / 3MP / 1080P / 1.3MP / 720P
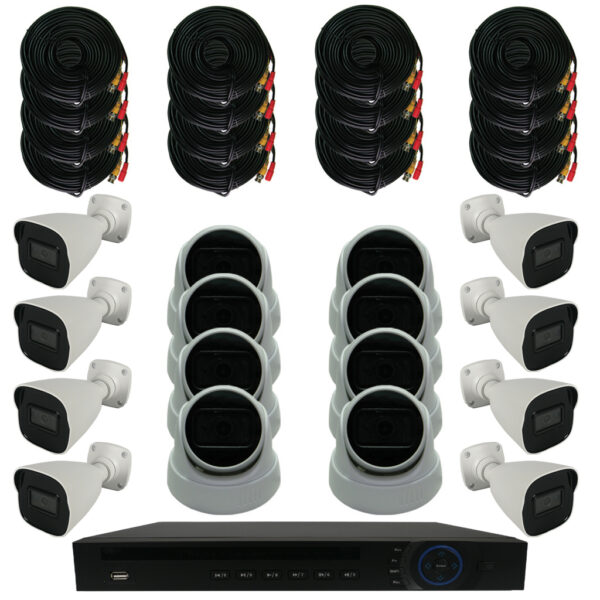
16 Channel DVR with Eight 8MP Dome Cameras & Eight 8MP Bullet Cameras
Specifications
- Recorder: PENDVR-ELE16M4K-AI
- Number Of Cameras: 16
- Number Of Hard Drives: 2
- Size: 1U
- Resolutions Capable: 4K, 6MP, 5MP, 4K-N, 4MP, 3MP, 4M-N, 1080P, 720P, 960H
Frequently Asked Questions (FAQ)
Q1: Can I install an outdoor camera myself? A: Yes, many outdoor cameras are designed for DIY installation. Follow the manufacturer’s instructions and this guide for a successful setup.
Q2: What height should I mount my outdoor camera? A: Mount the camera at a height that provides a clear view of the area without being easily reachable by intruders, typically 8-10 feet above the ground.
Q3: How do I protect my camera from the elements? A: Choose a weather-resistant camera and consider installing it under eaves or using a protective housing to shield it from rain and extreme weather.
Q4: Can I access my outdoor camera remotely? A: Yes, most modern outdoor cameras offer remote access via mobile apps or computer software, allowing you to monitor your property from anywhere.
Q5: How do I ensure my camera is secure from hackers? A: Use strong passwords, regularly update firmware, and enable encryption to secure your camera system.
Mounting an outdoor camera is a crucial step in enhancing your property’s security. By following this comprehensive guide, you can ensure a successful installation and enjoy the peace of mind that comes with effective surveillance.